Custom Unlaunch Backgrounds
You can find premade Unlaunch backgrounds on the TWiLight Menu++ skins site.
Using TWiLight Menu++ you can patch the Unlaunch installer to have a custom background image and text color palette. This needs to be a 256 x 192 GIF, with a few restrictions:
- Only the first frame will be shown, no animated backgrounds
- The file must be less than or equal to 15,472 bytes
- GIFs with more than 31 colors require specially made palettes to prevent breaking the text
Installing #
- Copy the GIF file to
sd:/_nds/TWiLightMenu/unlaunch/backgrounds - Download the latest Unlaunch installer and extract
UNLAUNCH.DSIto your SD card - Open TWiLight Menu++ Settings, switch to the
Unlaunch settingspage, and click onBackground, then select the one you want - Exit settings and launch
Unlaunch DSi Installer- It should use your custom image, if it does not then turn off your console and make sure your GIF conforms with the requirements above
- Choose
Install Now
Using GIFs with more than 31 colors #
As the GIF’s palette is loaded to the same area of VRAM as the text palettes it will overwrite them if the palette gets too large, however this can be worked around by including the text palettes in the GIF’s palettes. Using this with different colors would also let you have different text colors, should you want that. These instructions will be for GIMP, but any image editor capable of rearranging the palette of an image will work.
- Open your image in GIMP and make sure it’s 256 x 192 pixels
- In the menu bar at the top, select
Image->Mode->Indexed... - Select
Generate optimum paletteand set the maximum colors to anything up to 226 colors - Select a dithering pattern from the
Color ditheringdropdown- Images without dithering generally compress best, but with it will generally look better, try and see which looks best for the size
- Click
Convert - In the menu bar at the top, select
File->Export As..., give it a name with the extension.gif, and clickExport- If it gives any warnings, click the accept button
- In the next popup, disable the
GIF commentand clickExport - Check the size of the exported file, if it’s 15,472 bytes or less, then skip to step 13
- If your GIF is too large, then using either gifsicle or ezgif.com you can try optimizing it
- These instructions will use ezgif as its simpler, being a website
- Open https://ezgif.com/optimize, and upload your GIF
- Try different compression levels until you find the best one under 15,472 bytes (15.11 KiB), ideally a bit under as GIMP may increase the size a bit
- Save the optimized GIF and open it in GIMP
- In the menu bar at the top, select
Windows->Dockable Dialogs->Colormap - Change your current
Foreground colorto #080808 and add 14 new colors with the+button- If your image doesn’t have at least 133 colors you will need to keep adding colors until the last is index 146
- Right click a color in the Colormap and select
Rearrange Colormap... - Arrange your new colors so they match the ones outlined in red: (The 2nd and 3rd columns starting on the 4th row)
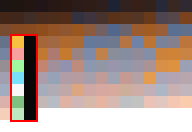
- Use the color picker to make your new colors match those in the above image
- In the menu bar at the top, select
File->Export As..., give it a name with the extension.gif, and clickExport - In the next popup, make sure
GIF commentis off and clickExport - Ensure the image is still under 15,472 bytes, if it’s gotten too big then repeat from step 10 using a higher compression level
- You’re done! Follow the installing section above to use your image!
Need help? Join our Discord server: DS⁽ⁱ⁾ Mode Hacking! (English only)