Unlaunchの背景をカスタマイズ
TWiLight Menu++ スキンサイトで、既製の背景を探せます。
TWiLight Menu++を使ってUnlaunchインストーラにパッチを適用すると、好みの背景画像とテキストカラーパレットが利用可能になります。 背景は256×192のGIFである必要があり、さらにいくつかの制約があります。
- 表示されるのは最初のフレームのみ。アニメGIFは再生されない。
- ファイルは15472バイト以下でなければならない。
- 31色以上のGIFには、テキストを壊さないために特別なパレットを作成する必要がある。
インストール #
- GIFファイルを
sd:/_nds/TWiLightMenu/unlaunch/backgroundsにコピーします。 - 最新のUnlaunchインストーラ をダウンロードし、
UNLAUNCH.DSIをSDカードに解凍します。 - TWiLight Menu++ 設定 を開き、
Unlaunch設定ページに切り替え、背景画像でAを押し、好みのものを選びます。 - 設定を終了し、
Unlaunch DSi Installerを起動します。- 選んだ画像が表示されているはずです。もしそうでない場合は本体の電源を切り、GIFが上記の要件に適合しているか確認してください。
Install Nowを選びます。
31色以上のGIFを使う #
As the GIF’s palette is loaded to the same area of VRAM as the text palettes it will overwrite them if the palette gets too large, however this can be worked around by including the text palettes in the GIF’s palettes. Using this with different colors would also let you have different text colors, should you want that. These instructions will be for GIMP, but any image editor capable of rearranging the palette of an image will work.
- Open your image in GIMP and make sure it’s 256 x 192 pixels
- In the menu bar at the top, select
Image->Mode->Indexed... - Select
Generate optimum paletteand set the maximum colors to anything up to 226 colors - Select a dithering pattern from the
Color ditheringdropdown- Images without dithering generally compress best, but with it will generally look better, try and see which looks best for the size
- Click
Convert - In the menu bar at the top, select
File->Export As..., give it a name with the extension.gif, and clickExport- If it gives any warnings, click the accept button
- In the next popup, disable the
GIF commentand clickExport - Check the size of the exported file, if it’s 15,472 bytes or less, then skip to step 13
- If your GIF is too large, then using either gifsicle or ezgif.com you can try optimizing it
- These instructions will use ezgif as its simpler, being a website
- Open https://ezgif.com/optimize, and upload your GIF
- Try different compression levels until you find the best one under 15,472 bytes (15.11 KiB), ideally a bit under as GIMP may increase the size a bit
- Save the optimized GIF and open it in GIMP
- In the menu bar at the top, select
Windows->Dockable Dialogs->Colormap - Change your current
Foreground colorto #080808 and add 14 new colors with the+button- If your image doesn’t have at least 133 colors you will need to keep adding colors until the last is index 146
- Right click a color in the Colormap and select
Rearrange Colormap... - Arrange your new colors so they match the ones outlined in red: (The 2nd and 3rd columns starting on the 4th row)
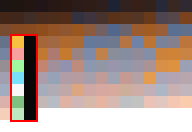
- Use the color picker to make your new colors match those in the above image
- In the menu bar at the top, select
File->Export As..., give it a name with the extension.gif, and clickExport - In the next popup, make sure
GIF commentis off and clickExport - Ensure the image is still under 15,472 bytes, if it’s gotten too big then repeat from step 10 using a higher compression level
- You’re done! Follow the installing section above to use your image!
ヘルプが必要ですか?Discordサーバーに参加してください:DS⁽ⁱ⁾ Mode Hacking!(英語のみ)