Video Players
As these video players (except for Rocket Video Player) do not have their own menus for opening a video, this guide assumes you are using TWiLight Menu++ with the Multimedia add-on installed. If you do not have the Multimedia add-on installed, see Installing Add-ons for how to install it.
Homebrew Video Players for the Nintendo DS(i) #
This page contains a list of working video players for the Nintendo DS and DSi that explains how each works.
| Player name | Supported containers/Codecs | Drawbacks | Max FPS | Temporal Dithering |
|---|---|---|---|---|
| FastVideoDS | .fv, FastVideoDS | Confetti spam slows down high FPS video. | 60fps (DSi mode), 30fps (DS mode) | No |
| Rocket Video Player | .rvid, RocketVideo | Large file size due to raw video output. | 72fps | Yes |
| Moonshell | .dpg, MPEG-1 | Can only reach a certain framerate/bitrate. | 24fps | Yes |
| tuna-viDS | .avi, XVid | Can only reach a certain framerate/bitrate. | 15fps | No |
| MPEG4Player | .mp4, MPEG-4 | Can only play short videos. | 24fps | No |
Notes:
- Actual max FPS is dependent on video content and length.
- Moonshell v1.x and beta builds of v2.00 may lock-up later on, if video bitrate is higher than around
192. It is recommended to use v2.10.
Comparison #
This can help with deciding which player to use.
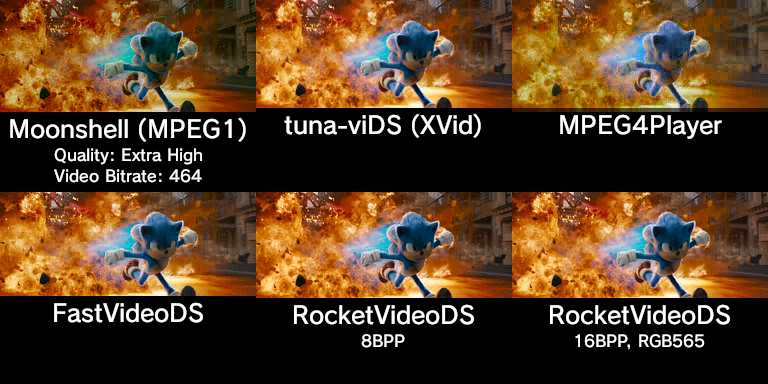
Tested with Sonic The Hedgehog (2020)
Picture Quality #
Look closely to see the differences.
Filesize #
- RocketVideo (16BPP RGB565, 32KHz 16-bit Stereo audio): 4.34 GB
- RocketVideo (8BPP, 32KHz 16-bit Stereo audio): 3.06 GB
- FastVideoDS: 663 MB
- Moonshell (Quality: Extra High, Video Bitrate: 464): 439 MB
- MPEG4Player: 311 MB
- tuna-viDS (12fps): 276 MB
FastVideoDS #
If you get a message saying This encoder requires a cpu with support for AVX2 instructions, then you need to either install a newer CPU chip, or use a newer PC.
Windows x64 #
- Download the .NET Runtime, and install it
- Download the FastVideoDS Encoder
- Download FastVideoDS.bat to the same place as the encoder
.exefile - Copy or move your video to the same place as the
.batfile - Drag and drop the copied or moved video into the
.batfile
When this process is done, it should be easy as drag and drop to SD card. Once you put the video on your SD card, it will be ready for playback via TWiLight Menu++.
Rocket Video Player (Advanced users, Windows x64 only) #
The only player which supports
- Videos up to 72FPS
- 60-72FPS support on DS and DS Lite
- Maximum quality 16BPP RGB565 playback
- Dual-screen videos
Moonshell video conversion (DPG4x) #
- Download DPG4x
- Open
dpg4x.7z - Open
dpg4x-2.3.3.0.zip(3.0-1 gives out an error when opening, for an unknown reason) - Open
dpg4x-2.3.3.0_setup.exe, and proceed with installation - After installation, open DPG4x
- Click the
VIDEOtab - Tick the
Keep Aspectoption - Set
Video Bitrateto your choice (higher should improve quality) - Click the
AUDIOtab - Tick
Normalize Volume, if your video is a bit quiet - Click the
SUBTITLEStab - Set
Subtitles SourcetoDisable Subtitles, as certain subtitle tracks may not display correctly - Click the
MAINtab - Click
Add Mediato open your video file(s) - Set
DPG Versionto4, if you’re using Moonshell v2.x, otherwise set to3or below - Set
Qualityto your choice - Click
Start Encodingto convert the video(s)
When this process is done, it should be easy as drag and drop to SD card. Once you put the video on your SD card, it will be ready for playback via Moonshell.
tuna-viDS #
Windows #
First you want to grab your video of choice. It is recommended that your video be 4:3, but FFmpeg add black bars to the video if it isn’t.
Warning: Do not change the ROM settings of Tuna-ViDS, it will not boot properly. This guide assumes you have the latest build of TWiLight Menu++.
Next, download FFmpeg from this direct link and extract it to C:\ffmpeg or somewhere you can access without admin rights.
You should probably stay in the safe zone for converting videos (10-15fps), otherwise your video may crash your console. Slowdowns may occur on busy scenes (confetti, rain, etc).
To use FFmpeg everywhere, it is recommended to add the directory to your system environment variable path. This may break programs which rely on FFmpeg, so make sure to remove the entry when you’re done.
Drag and drop your video into one of these batch files to convert it:
- xvid-ds.bat: Converts to 12FPS video optimal for DS consoles
- xvid-dsi.bat: Converts to 12FPS video optimal for DSi consoles
- xvid-ds-vol4.bat: Converts to 12FPS video optimal for DS consoles with 400% volume increase
- xvid-dsi-vol4.bat: Converts to 12FPS video optimal for DSi consoles with 400% volume increase
If you want, you can change the following in one of the above .bat files:
12in-r 12to a different one between10and15for a different frame rate-2inscale=256:-2to your desired vertical resolution, if the video appears distorted
When this process is done, it should be easy as drag and drop to SD card. Once you put the video on your SD card, it will be ready for playback via TWiLight Menu++.
The video will quit to the menu after it is done playing, so if you want to loop videos, you are going to have to paste-repeat it in a video editor then convert it to an xvid avi using this method.
MPEG4Player #
Windows #
- Download FFmpeg v7.0.2 from this direct link (Later versions will not work with this method)
- Extract it to
C:\ffmpegor somewhere you can access without admin rights - After extraction, rename
ffmpeg.exetoffmpeg702.exe - Drag and drop your video into this batch file to convert it: dsmp4.bat