Rocket Video Player
Advanced users, Windows x64 only #
This is a time-consuming process, and may not be noob-friendly. It should only be followed if you are an advanced user.
- Download Vid2RVID
- Download VirtualDub2 build 42671 (a later build may not extract frames properly)
- Download and install Audacity
- Download and install the first-listed
Win64 dynamic at 16 bits-per-pixel componentbuild of ImageMagick underWindows Binary Release- During installation, once you’ve reached
Select Additional Tasks, tick onAdd application directory to your system path
- During installation, once you’ve reached
- Create a folder which will later contain the video’s frames. It can go anywhere, but creating a folder called
rvidFramesand placing it in the same place asVid2RVID.exewill work as well
Extracting video frames #
- Open VirtualDub2
- Click
File->Open video file... - Search for the video file, and open it
- Click
Video->Filters... - Click
Add... - Search for
resize, and click on it - Click
OK - Under
New size, change the top-left number to one of the following:240for GameBoy Advance256for Nintendo DS, DS(i), and 3DS/2DS
- If the top-right number is higher than the top-left number, please change it to one of the following:
160for GameBoy Advance192for Nintendo DS, DS(i), and 3DS/2DS
- Click
Video->Frame Rate...to check the video’s frame rate displayed next toNo change (current:, and keep it in mind (or write it somewhere) for when you’ll use Vid2RVID later - Click
File->Export->Image sequence... - Set the exact following in this screenshot:
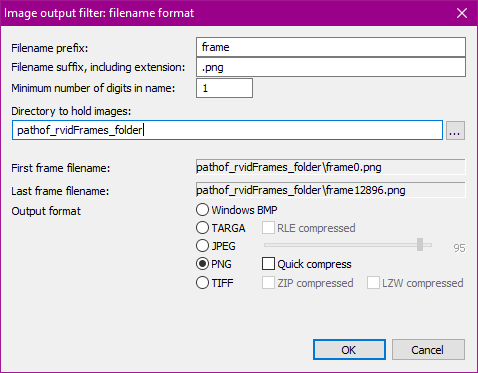
and click...to find the new folder where the extracted video frames will go - Click
OKto export the frames, and wait until the extraction is done
Extracting video frames (bottom screen) #
If your video is for the GBA and/or is not dual-screen, skip to Extracting audio
- Make sure the video is the exact same aspect ratio and resolution as the video for the top screen (ex. if the top screen video is 4:3, the bottom screen video must also be 4:3)
- Create a folder called
bottominside the folder containing the video’s frames - Follow the above steps for
Extracting video frames, but for step 11, open thebottomfolder - Make sure the amount of
.pngfiles in the root frame folder and in thebottomfolder are the same, otherwise Vid2RVID will complain about the amount of frames not matching
Extracting audio #
If your video does not have audio, skip to Converting to the .rvid format
- Click
Audio->Full processing mode - Click
Audio->Conversion... - Under
Precision, click16-bit - Under
Channels, click eitherMonoorStereo- If the video is for GBA, only
Monois supported
- If the video is for GBA, only
- Click
File->Save audio...to save the.wavfile somewhere - Open Audacity
- Click
File->Open... - Search for the
.wavfile, and open it- If you’re asked to set the project tempo, click
Yes
- If you’re asked to set the project tempo, click
- Click on the left-side box of the audio stream
- If the audio waveform is below
0.5, clickEffect->Volume and Compression->Amplify... - Make sure
Allow clippingis ticked - Depending on how low the wafeform is, set
Amplification (dB)to either6or12(or something in between) - Click
Apply - If this is stereo audio:
- Right-click on the left-side box of the audio stream
- Click on
Split Stereo to Mono - Click
Soloon the top stream to mark it
- Click
File->Export Audio... - Set
File Nametosound.raw - Set
Folderto the folder containing the video’s extracted frames - Set
FormattoOther uncompressed files - Set
ChannelstoMono - Set
Sample Rateto32000Hzor less, keep that in mind (or write it somewhere) for when you’ll use Vid2RVID later - Set
HeadertoRAW (header-less) - Set
Encodingto eitherSigned 8-bit PCMorSigned 16-bit PCM, keep that in mind for Vid2RVID as well - Set
Export RangetoEntire Project - Click
Export - If this is stereo audio:
- Click
Soloon the top stream to unmark it - Click
Soloon the bottom stream to mark it - Repeat steps 15-24, but set
File NametosoundRight.rawinstead ofsound.raw
- Click
Converting to the .rvid format #
- Open Vid2RVID by dragging and dropping the folder containing the video’s extracted frames into
Vid2RVID.exe - Press the
ENTERkey - Choose which console the video is for, by pressing one of the number keys and pressing
ENTER - Choose the amount of colors to display on-screen
- When asked to choose the frame rate, choose the one that you’ve kept in mind during the video frame extraction process in VirtualDub2
- When asked to choose the audio sample rate, choose the one that you’ve kept in mind during the audio export process in Audacity
- When asked to choose the encoding of the audio, choose either
8-bitor16-bitdepending on which one you picked during the audio export process in Audacity - You’ll now be asked if the entered information is correct. If you believe it to be correct, press the
1key to save the information and begin the conversion process - If you’ve picked
256 (8 BPP, RGB565)as the color amount, open theProcess Frames.batfile that has been created in the same place as the folder containing the video’s frames, and wait until it’s done, where you can then press theENTERkey to continue- If you’ve gotten an error for one of the video frames, that means ImageMagick has failed to process that frame, so it’ll not be displayed properly in Rocket Video Player
When this process is done, drag and drop the new .rvid video file(s) (and the .rvidsnd file, if it exists) to SD card. Once you put the video on your SD card, it will be ready for playback via TWiLight Menu++ or the standalone Rocket Video Player.
Need help? Join our Discord server: DS⁽ⁱ⁾ Mode Hacking! (English only)